حذف برنامه های پیش فرض گوشی
Android SDK Platform Tools download is now available as a zip file directly from Google. Just download the latest SDK platform-tools zip containing ADB and Fastboot binaries for Windows, Mac, and Linux from below and unzip it. You can then be able to execute ADB and Fastboot commands to install APK, reboot your Android into the bootloader mode and flash stock ROM and recovery images using your Windows, Mac or Linux or Ubuntu computer.
The Android SDK and Android Studio are tools for developers only and they are used for Android application development purposes. However, if you are just a nerd who messes around your phone for smaller jobs like unlocking the bootloader, flashing boot or recovery image or the full factory images occasionally, downloading the full Android SDK or Studio is no more necessary. You can now download the latest ADB and Fastboot tool or Android SDK Platform-Tools zip file depending on your computer’s OS separately.
Platform-Tools is a component of the Android SDK and it includes different tools, such as ADB, fastboot, and systray. If you have ever wanted to download ADB and Fastboot without having to download the whole of Android Studio or SDK, Google has finally made those binaries available officially for Windows, Mac, and Linux. Thus you can now download the latest ADB and Fastboot files from Google Developer site.
Before this new development, users had to download Android SDK or Studio, which are a 400MB to 1.6GB download, and rely on 3rd-party sources to grab the ADB and Fastboot drivers. You must be familiar with Minimal ADB and Fastboot executable that we needed to install to get the Android SDK Platform Tools.
In many cases, the 3rd-party downloads contain malicious stuff like Trojans. Furthermore, to get the latest SDK platform tools, we had to keep an eye on the new releases. Sometimes the latest version of such executable tools installs the outdated ADB and Fastboot binaries. It’s time now to get rid of the middlemen and get the latest tools straight from Google.
Read Also: How to Setup ADB and USB drivers on Ubuntu
Why download a giant package of junk if you need just a small chunk? The size of the official Platform Tools is less than 4MB.
Download Android SDK Platform Tools
SDK Platform Tools for Windows
platform-tools-latest-windows.zip
ADB Platform Tools for MacOS
platform-tools-latest-darwin.zip
SDK or ADB Platform Tools for Linux and Ubuntu
platform-tools-latest-linux.zip
You can also visit the official page and take a look at the release note. If you want to use your Android phone like a PC for executing ADB and Fastboot commands, please read out guide on the topic.
Useful Tip: How to Hide Root on Android and Pass SafetyNet Check
Steps to Use and Execute ADB Commands
Having downloaded the latest SDK Platform-Tools.zip file, just extract it on your desktop. Open the extracted folder, and launch a command window inside the “platform-tools” folder and execute the desired ADB and Fastboot commands.
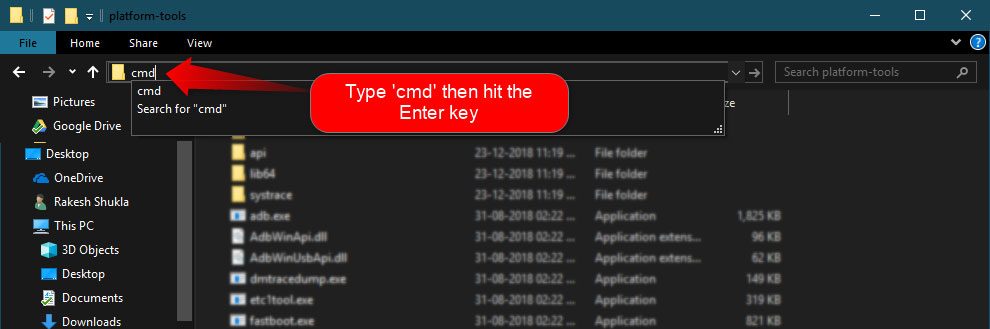
There are two ways to open the command window from a folder window. The easiest and quickest way to launch the command or cmd prompt window from the platform-tools folder window is to type “cmd” in the window address bar and hit the Enter key.
You can also open a command prompt on Windows as follows. Pace the mouse pointer at any empty space inside the folder, then press Shift key+ Right-click on the mouse and select “Open command window here” or “Open PowerShell window here” (on Windows 10) option.

Having launched the CMD window, you can execute ADB or Fastboot commands.
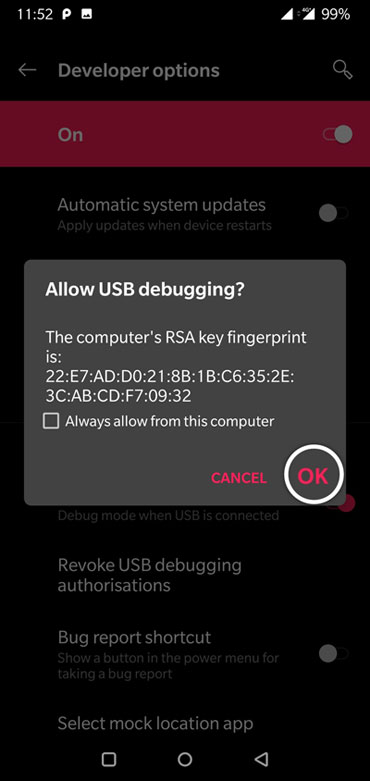
Don’t forget to authorize ADB and allow USB debugging on your Android device when prompted. Also, to be able to use ADB and Fastboot commands, you must enable USB debugging on your device.
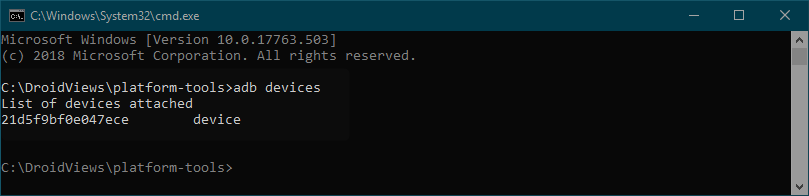
For instance, if you want to check the connection between your Android device and computer, you can try the following command:
adb devices
Similarly, you can reboot your Android device into the Bootloader mode using “adb reboot bootloader” command and even install an APK app. Do not forget to check out the full list of ADB and Fastboot commands.
ADB Commands List
As mentioned earlier, ADB commands are used when the device is powered on and you have access to the device. That is, you can unlock the device and grant ADB debugging permission to the computer. Listed below are some of the most common and useful ADB commands that you may need at some point. You can even use your Android phone like a PC to execute ADB and Fastboot commands.
adb help
Displays the Help Documentation on ADB commands.
adb devices
Shows all the devices connected to ADB. Can be used to make sure your device is connected properly before performing any other operations.
adb usb
It shows all Android devices and emulators connected to your computer via a USB cable.
adb devices //show devices attached
This command will display the list of all Android devices attached to your PC.
adb connect ip_address_of_device
Using the ‘adb connect’ command, you can connect the IP address of your Android device to your computer.
adb reboot
ADB can be used to reboot your device, useful when your hardware buttons aren’t working or if you’re already using ADB. You can also reboot directly into the recovery or bootloader using this command.
adb reboot bootloader
Reboots the device into the Fastboot or Bootloader mode.

adb reboot recovery
Reboots the device into recovery mode.
adb install
It can be used to install an APK file on your Android device from your computer. It is more convenient than the alternative, which is to transfer the APK to the device and then install it. This command is generally used by developers or debuggers. Please note that you must copy the APK file to install in the ‘platform-tools’ folder, otherwise you’ll also have to type the location of the APK.
adb install OPLiveWallpapers.apk
Use the following command to re-install or update an existing app on your device and keep its data.
adb install -r OPLiveWallpapers.apk
If the app (APK) you are installing supports move to SD card feature, you can install it to the SD storage using the following command.
adb install -s OPLiveWallpapers.apk
adb install –k <.apk file path on computer>
Below are some more parameters that can be used with the ‘adb install’ command:
adb -e install path/to/app.apk
-d (directs command to the connected USB device.)
-e (directs command to the running emulator.)
-s<serial number>
-p <product name or path>
adb uninstall
This command can be used to uninstall an installed app, which is pretty clear from the command itself.
adb uninstall com.facebook.katana
Use the following command if you want to uninstall an app package but keep its data and cache directories.
adb uninstall -k com.facebook.katana
Keep the data and cache directories around after package removal.
adb logcat
Displays the log data onto the screen. You can use this command with the following parameters for different purposes as shown below.
adb logcat -c // clear //
By adding the ‘-c’ parameter to the ‘adb logcat’ command, you can clear the existing logs on an Android device.
adb logcat -d > [path_to_file] //
Similarly, by using the ‘-d’ parameter, you can save the logcat output to a file on your computer.
adb bugreport
Displays the Android device information such as dumpsys, dumpstate and logcat data on the screen.
adb jdwp
Lists the JDWP (Java Debug Wire Protocol) processes on the device. if you’re not already aware of it, chances are you don’t have to worry about it either.
Don’t Miss: 50 Best Apps for Rooted Android Devices
adb get-serialno
Displays the adb instance serial number string with the device.
adb get-state
Shows the status of the device.
adb wait-for-device
This command is used to program delay before the next command is issued. It executes when the device is online but it can be programmed to wait till another process is done.
adb start-server
Starts the adb server process.
adb kill-server
Stops the adb server process (terminal adb.exe process).
adb sideload
Just as you can flash zip packages from a custom recovery, you can also do it via adb sideload, provided the recovery supports it. TWRP recovery which is the most common custom recovery for all devices does support it. This way you can flash packages directly from your computer without having to transfer them first to your device or any external storage.
To sideload a mod or update.zip file successfully, you must copy it first to the SDK folder.
adb sideload sample.zip
adb pull
This command can be used to pull any files from your device and save it on your computer. To download or pull a file from your Android device to the SDK platform-tools directory, use
adb pull /sdcard/screenrecord.mp4
If you want to download a file from your phone’s storage to a specific drive on your computer, execute the following command
adb pull /sdcard/screenrecord.mp4 e:\
adb push
Similarly, this command can be used to push a file from your computer to your device. If the file to be pushed it save in the SDK folder, use
adb push OPLiveWallpapers.apk /sdcard
To push or send a file to your Android from a specific drive on your computer, use
adb push e:\OPLiveWallpapers.apk /sdcard
Having given you the above ADB commands list, let’s check out the ADB Shell commands list below.
adb backup //
By using this ADB command, you can create a full backup of your Android device and save to your computer.
adb backup //
adb restore //
Use this command to restore a backup to your device.
adb restore //
ADB Shell Commands List
Below is the list of some really useful ADB shell commands.
adb shell
The ‘adb shell‘ command starts the remote shell command console in the device and lets you control the device through it.
adb shell pm uninstall -k –user 0
You can uninstall or remove any system app installed on your Android device. This is the easiest way to uninstall bloatware. Just use the following command followed by the app package name.
pm uninstall -k –user 0 com.facebook.katana
Learn more about debloating Android devices without root in our dedicated article.
adb shell dumpsys
You can use this ADB shell command to dump all system data about your Android device’s hardware and software configuration.
adb shell dumpsys
You can also use it to get information about specific components of your device, such as display, battery, etc.
adb shell dumpsys display
adb shell dumpsys battery
adb shell dumpsys batterystats
adb shell wm density
This command allows you to change the pixel density of your Android device’s display without any hassles. In order to change your Android phone’s screen resolution, you must know its original resolution. If you don’t know that, execute the following command:
adb shell dumpsys display
Issuing the above command for the Galaxy S9+ gave me the following info about my phone’s display resolution and density.
mDisplayInfos= PhysicalDisplayInfo{1440 x 2960, 60.000004 fps, density 3.5, 530.086 x 529.464 dpi
Now, if I want to set a lower resolution for my Galaxy S9+, I’ll use the following commands. This value can vary per phone, you’ll know it’s right when you can read text and apps don’t render too small value is from 120 up to 640
for 1080p (FHD)
adb shell wm size 1080×2220
adb shell wm density 480
for 720p (HD)
adb shell wm size 720×1560
adb shell wm density 350
adb shell pm list packages
The following commands print the names of all app packages installed on your Android device. You can add additional conditions or filters to list specific packages only.
To list all packages:
adb shell pm list packages
To get a list only system packages
adb shell pm list packages -s
To list only 3rd-party packages
adb shell pm list packages -3
To show only the disabled app packages:
adb shell pm list packages -d
To show only enabled app packages
adb shell pm list packages -e
To list uninstalled app packages with installed pages.
adb shell pm list packages -u
ADB Shell command to Send SMS screen
By sung this command, you can send the text message screen with the message content and phone number.
adb shell am start -a android.intent.action.SENDTO -d sms:+919792211100 –es sms_body «Test –ez exit_on_sent false
adb shell screencap
By using the following ADB shell commands, you can capture the screenshot of your device display and then download the captured screen to your computer.
adb shell screencap /sdcard/screenshot.png
adb pull /sdcard/screenshot.png
adb shell screenrecord
On Android devices running Android 4.4 KitKat and above, you can even record your phone or tablet’s screen and download the recorded video to your computer using the ADB shell commands. Besides, you can also set conditions like video duration, resolution in pixels and video bitrate, etc. You need to press Ctrl+C to stop recording manually.
adb shell screenrecord /sdcard/screenrecord.mp4
adb pull screenrecord /sdcard/screenrecord.mp4
Use the following command to set the width x height of the video:
adb shell screenrecord –size 1920×1080 /sdcard/screenrecord.mp4
By default, Android’s screen recorder’s duration is set to 180 seconds (3 minutes). You can decrease this time limit according to your needs (180 seconds is the maximum limit).
adb shell screenrecord –time-limit 120 /sdcard/screenrecord.mp4
Similarly, you can also determine the bitrate of the video output. To set the bitrate to 4MBPS, for example, you can use the following value:
adb shell screenrecord –bit-rate 4000000 /sdcard/screenrecord.mp4
adb shell cd
Change ADB shell directory using ‘cd <directory>‘
adb shell (Hit Enter then the following command) cd /system
adb shell rm
By using this ADB shell command, you can remove any file or directory from your Android device.
To do that, you have to type ‘adb shell‘ command first and hit the Enter key. After that, you can use one of the following commands followed by the file or directory name as shown below.
Delete a file:
rm -f /sdcard/OPWallpaperResources.apk
Delete a directory or folder:
rm -d /sdcard/ZooperWidget
You can also use ‘rmdir‘ in place of ‘rm -d‘ to remove a directory.
adb shell mkdir
This ADB shell command is used to create a new directory or directories under an existing directory. You can also set permission for the directory too. Execute ‘adb shell’ and then the following commands:
mkdir /sdcard/NewFolder
mkdir -m 644 /sdcard/NewFolder
mkdir -p /sdcard/NewFolder/Folder1
adb shell cp & adb shell mv
You can use these commands to copy, move and rename files and directories. Again, you need to start with the ‘adb shell‘ command first.
To copy files and then paste them, by mentioning the source and destination locations as shown below:
cp /sdcard/OPWallpaperResources.apk /sdcard/LiveWallpapers
To move a file from one location to another, type the following command mentioning the source and destination locations:
mv /sdcard/OPWallpaperResources.apk /system/app
If you want to move a file to a different location with a new name,
mv /sdcard/OPWallpaperResources.apk /sdcard/OPLiveWallpapers.apk
adb shell netstat
To check the network statistics of your Android device, execute ‘adb shell‘ command and type:
netstat
adb shell ip
Using this command, you can see, your phone’s Wi-Fi IP address. Execute ‘adb shell‘ in the command window and then issue the following command:
ip -f inet addr show wlan0
adb shell top
If you want to know about the top CPU processes running on your Android device, you can use the following command after executing ‘adb shell‘:
top
If you want to stop CPU processes monitor, press Ctrl+C on your keyboard.
adb shell getprop & adb shell setprop
Using the above commands, you can not only get the properties of your Android’s build.prop configuration but can also set a value of property tag on the build.prop. See the examples below:
Type ‘adb shell‘ in the cmd window, hit the Enter key and then issue the following command:
getprop
Below are some more examples:
getprop ro.build.version.sdk
getprop ro.chipname
Now, to set the value of a specific build.prop property, you can use the ‘adb shell setprop‘ commands. See the examples below:
setprop net.dns1 1.2.3.4
setprop net.dns2 1.2.3.5
Similarly, you can also set a custom VMHeap size:
setprop dalvik.vm.heapsize 40m
ADB Shell KeyEvent commands
By using the following ADB Shell key event commands, you can trigger certain actions performed by certain hardware buttons or UI options on Android devices.
adb shell input keyevent 3 // Home btn
adb shell input keyevent 4 // Back btn
adb shell input keyevent 5 // Call
adb shell input keyevent 6 // End call
adb shell input keyevent 26 // Turn Android device ON and OFF. It will toggle device to on/off status.
adb shell input keyevent 27 // Camera
adb shell input keyevent 64 // Open browser
adb shell input keyevent 66 // Enter
adb shell input keyevent 67 // Delete (backspace)
adb shell input keyevent 207 // Contacts
adb shell input keyevent 220 / 221 // Brightness down/up
adb shell input keyevent 277 / 278 /279 // Cut/Copy/Paste
Learn more about tweaking VM heap size to improve Android’s performance.
Fastboot Commands Lists
These commands can be used only when the device is in the Fastboot mode. You can try a button combination to put your device into this mode or use the ADB command mentioned above.
adb reboot bootloader
Once in Fastboot mode, you can use a number of Fastboot commands as mentioned below.
fastboot devices
Displays all the connected devices. Can be used similarly as the ‘adb devices’ command to make sure the device is properly connected.

fastboot oem unlock
Unlocks the bootloader on some Android devices such as Pixel or OnePlus. Most other Android devices require you to get an unlock key from the OEM.
fastboot oem lock
Used to relock the bootloader of your device.
fastboot reboot bootloader
Reboots the device from the fastboot mode back into fastboot mode. Sometimes this may be necessary when you’re flashing things in the fastboot mode.
fastboot flash
This command can be used to flash things onto your device. This can be a zip file, a boot image or a recovery image.
fastboot flash boot boot_image.img
Flashes a boot image to your device.
fastboot flash recovery recovery_image.img
Flashes a recovery image to your device.
fastboot boot image_file.img
This command can be used to boot your device using a certain image file without having to flash it first. Can be useful to test an image before flashing it. Should you have any questions about Fastboot commands, please let us know.
So, here end our list of useful ADB and Fastboot commands that can help Android users perform a plethora of commands using cmd. Let’s know if we forgot to mention any command that should have been our list.
برگرفته سایت droidviews.com
مخفي سازي فايل در درون عكس توسط نرم افزار winrar
مخفی سازی فایل در درون عکس توسط نرم افزار WinRar
در حاضر نرم افزار WinRar را میتوان معروفترین و همچنین قدرتمندترین نرم افزار فشرده سازی فایل دانست. بسیاری از کاربران از این نرم افزار به منظور فشرده سازی فایلها و همچنین باز کردن فایلهای فشرده rar و zip استفاده میکنند. اما از این نرم افزار میتوان استفاده دیگری نیز کرد! در این ترفند قصد داریم به معرفی ترفندی بپردازیم که با بهره گیری از آن میتوان یک فایل یا یک فولدر را در داخل یک عکس مخفی ساخت! به شکلی که پس از مخفی سازی شما تنها یک عکس خواهید داشت و تنها با باز کردن عکس توسط خود نرم افزار WinRar میتوان به فایل دسترسی داشت. از این ترفند میتوان به عنوان یک شیوه بسیار حرفهای مخفی سازی فایل و فولدر نام برد.
برای این کار:
شما به یک فایل تصویر با فرمت GIF و یا JPG و همچنین فایل یا فولدری که میخواهید مخفی کنید نیاز خواهید داشت.
ابتدا باید باید فایل یا فولدر مورد نظر را توسط خود نرم افزار WinRar فشرده سازی کنید. بدین منظور روی آن راست کلیک کرده و Add to archive را انتخاب کنید. محض نمونه نام آن را Feshorde.rar بگذارید.
اکنون این فایل فشرده که قصد مخفی سازی آن را دارید را در کنار تصویر مورد نظر خود که به عنوان مثال Feshorde.jpg نام دارد قرار دهید.
یعنی این دو فایل در کنار هم و در یک پوشه.
حال، از منوی Start وارد Run شده و دستور cmd را وارد کرده و Enter بزنید تا وارد Command Prompt شوید. اکنون در داخل CMD به فولدری که این دو فایل در آن قرار دارد مراجعه کنید. (یادآوری میشود برای تعویض دایرکتوری در CMD از دستور cd استفاده میشود.)
پس از مراجعه به دایرکتوری مورد نظر، کافی است کد زیر را در CMD وارد کرده و Enter بزنید:
copy /b Feshorde.jpg + Feshorde.rar New-Feshorde.jpg
در کد فوق Feshorde.jpg نام عکس اولیه، Feshorde.rar نام فایل فشرده که قصد مخفی سازی آن را داریم و در پایان New-Feshorde.jpg نام عکس تولیدی جدید است که فایل فشرده در آن مخفی میشود.
حالا کافی است به فولدری که فایلها در آن موجود بود مراجعه کنید ، یک عکس با نام New-Feshorde.jpg ایجاد شده است. تصویر این عکس همان عکس اولیه است، اما در داخل این عکس جدید فایل فشرده ما نیز مخفی شده است که به هیچ وجه قابل مشاهده نیست!
اما برای دستیابی به فایل مخفی شده کافی است روی عکس تولید شده راست کلیک کرده و از Open with روی Choose Program کلیک کنید. در صفحه باز شده از میان لیست برنامه ها WinRar را انتخاب نموده و OK کنید. خواهید دید که نرم افزار WinRar عکس شما را به گونهای اجرا میکند که فایل مخفی شده در دل عکس نیز پدیدار میگردد! حالا کافی است در WinRar دکمه Extract to را بزنید تا فایل فشرده از دل عکس خارج گردد.
اعمال تغيرات با كد جاوا در فايرفاكس
دو دستور كد با جاوا براي اعمال تغييراتي در مرورگر فايرفاكس:
همانطور كه ميدانيد برخي سايتها براي جلوگيري از دزدي مطالبشان با چند راهكار ميتوانند متن را قفل كنند كه ديگر كسي نتواند آنها را Copy و در جائي ديگر Paste كنند.
كد جاوائي كه در زير ميآيد براي اين است كه صفحات سايتي كه ملاحظه ميكنيد، بصورت موقتي طبق خواست شما تغيير كند. ولي همين عمل باعث شده كه بدون هيچ مشكلي متني را كه قفل شده و نميتوان Copy كرد، با اين كد جاوا به راحتي Copy و ذخير كرد.
javascript:document.body.contentEditable=’true›;
document.designMode=’on›; void 0
كد را در آدرس بار فايرفاكس Paste كنيد
دومين كد جاوائي كه قصد دارم معرفي كنم، بيشتر به سرگرمي ميماند تا استفاده كاربردي آن در اينترنت. اين كد جاوا كه در زير ميآيد باعث شده، تصاويري كه در آن صفحه اينترنتياي كه وارد شدهايد، در حالتي منظم و به شكلي دوراني در مسيري بصورت نماد بي نهايت حركت كنند.
javascript:R=0; x1=.1; y1=.05; x2=.25; y2=.24; x3=1.6; y3=.24; x4=300; y4=200; x5=300; y5=200; DI=document.images; DIL=DI.length; function A(){for(i=0; i-DIL; i++){DIS=DI[ i ].style; DIS.position=’absolute›; DIS.left=Math.sin(R*x1+i*x2+x3)*x4+x5; DIS.top=Math.cos(R*y1+i*y2+y3)*y4+y5}R++}setInterval(‹A()›,5); void(0);
كد را در آدرسبار فايرفاكس Paste كنيد
افزايش سرعت ADSL در فايرفاكس
در این که هنوز هم مرورگر فایرفاکس سریعترین و قدرتمندترین مرورگر دنیاست شکی نیست ، این مرورگر که از سرعت بسیار بالایی در بارگزاری صفحات وب بهره می برد امنیت بسیار بالایی نیز دارد. شاید مهم ترین مشکلی که بتوان به این مرورگر گرفت مصرف نسبتا بالاتر آن با توجه به مرورگرهای دیگر از فضای سخت افزاری سیستم باشد. میزان فضایی از حافظه رم که در هنگام استفاده از این مرورگر مصرف می شود شاید بیشترین میزان در مقایسه با دیگر مرورگرها باشد؛ در این ترفند جالب که هیچ نیازی به نرم افزار خاصی ندارد قصد داریم تا افزایش سرعت مرورگر فایرفاکس را ا دو برابر تضمین کرده و در عین حال فضای مصرفی حافظه رم را در هنگام اجرای فایرفاکس تا حد زیادی کاهش دهیم. نکته مهم این است که این ترفند تنها برای کاربرانی که از ارتباط اینترنتی ADSL بهره می برند مناسب بوده و تاثیرگذار خواهد بود. پس از انجام این ترفند ساده مطمئنا متوجه تفاوت آن نسبت به قبل خواهید شد. انجام این ترفند شامل چند قسمت خواهد شد:
برای کاهش میزان فضای مصرفی کش داخلی فایرفاکس از رم سیستم کافیست مراحل زیر را انجام دهید:
در نوار آدرس فایرفاکس عبارت about:config را تایپ نموده و وارد یک صفحه جدید شوید. در صفحه با پیغامی رو به رو می شوید که می بایست با زدن دکمه I’ll be careful , I promise وارد صفحه اصلی تغییرات شوید . ( توضیح این که در تمامی موارد ترفند : این مرحله نیز تکرار خواهد شد )
عبارت ” browser.sessionhistory.max_total_viewers ” را با جست و جو پیدا نموده و با کلیک برروی آن مقدار آن را که به صورت پیش فرض ۱- است را به ” ۰ ” تغییر دهید.
اما برای افزایش سرعت لود نمودن صفحات وب نیز باید مراحل زیر صورت گیرد:
وارد صفحه about:config شوید .
” network.http.pipelining ” را پیدا نموده و مقدار آن را با دوبار کلیک به ” True ” تغییر دهید.
” network.http.proxy.pipelining ” را پیدا نموده و مقدار آن را با دوبار کلیک به ” True ” تغییر دهید.
” network.http.pipelining.maxrequests ” پیدا نموده و با دوبار کلیک مقدار آن را برای مثال به عددی مانند ۳۰ تغییر دهید. این عمل باعث می شود که در یک لحظه ۳۰ بار مرورگر شما از سرورسایت برای گرفتن اطلاعات درخواست دهد.
در آخرین مرحله با راست کلیک برروی صفحه و از گزینه ” New ” وارد قسمت ” Integer ” شده نام را ” nglayout.initialpaint.delay ” قرار داده و مقدار آن را ” ۰ ” قرار دهید. انجام این مرحله هم باعث می شود که مرورگر شما برای دسترسی به اطلاعات سایت ۰ ثانیه صبر کند.
ساخت و تغییر مقدار ” network.dns.disableIPv۶ ” به ” False “
ساخت و تغییر مقدار ” content.notify.backoffcount ” به ” ۵ ” و ساخت و تغییر مقدار ” ui.submenuDelay ” به ” ۰ ” انجام این مرحله در افزایش سرعت را به پایان خواهد رساند.ضمنا این سه مقدار باید به صورت Integer ساخته می شوند.
انجام این مراحل تا حد زیادی در سرعت بارگزاری مرورگر فایرفاکس تاثیر گذار خواهد بود به طوری که پس از مدت کوتاهی حتما متوجه این تغییر در سرعت نیز خواهید شد.
مرحله پایانی هم برای کاهش ۱۰ مگابایتی حافظه مصرفی رم در زمان minimize بودن فایرفاکس است:
بازهم وارد صفحه ” about:config ” شوید.
با راست کلیک در صفحه و انتخاب گزینه ” Boolean ” ، از زیر مجموعه های گزینه ” New ” ، نام را ” config.trim_on_minimize ” و مقدار را ” True ” انتخاب کنید.
حالا مرورگر خود را یک بار Restart کرده و از سرعت بالا هم در اجرا و هم در بارگزاری صفحات لذت ببرید.
بالا بردن سرعت ویندوز XP با بهینه سازی مقدار L2 Cache پردازنده
همانطور که میدانید در CPU بخشی به نام Level2 Cache یا به طور خلاصه L2 Cache وجود دارد که وظیفه آن ذخیره اطلاعات فایل اجرا شده در درون خود میباشد. بهطوریکه که وقتی شما نرم افزار، بازی و هر فایل اجرایی دیگر را اجرا میکنید، اطلاعات اصلی فایل که برای اجرا لازم است در درون L2 Cache در CPU ذخیره میشود و اگر شما همان زمان از برنامه خارج شوید و دوباره آن را اجرا کنید خواهید دید که این بار با سرعتی بیشتر اجرا میشود. علت آن این است که اطلاعات اصلی مورد نیاز برای اجرای فایل، در مرتبه اولی که فایل را اجرا کردید در L2 Cache ذخیره شده و در دفعات بعدی به هنگام اجرا با سرعت بیشتری بارگذاری میشود. از این رو هم اکنون قصد داریم ترفندی ساده را به شما معرفی کنیم تا بتوانید از حداکثر توانایی L2 Cache استفاده کنید و در نهایت سرعت ویندوز XP خود را تا چندین برابر افزایش دهید.
در طی عملیات نصب ویندوز XP ، ویندوز CPU را برای پی بردن به مقدار L2 Cache آن را تست میکند تا و مثلأ اگر L2 Cache پردازده شما برابر با 1024 کیلوبایت باشد، برای ویندوز همین مقدار را تعیین کند. اما گاهی اوقات ویندوز در طی عملیات نصب نمیتواند مقدار L2 Cache پردازده شما را تشخیص دهد و به همین دلیل، مقدار L2 Cache را پیشفرض 0 (یعنی 256 کیلوبایت) قرار میدهد. در این حالت ویندوز فقط از 256 کیلوبایت از L2 Cache شما استفاده میکند. در حالی که ممکن است L2 cache شما بسیار بیشتر از این حد باشد.
برای تعریف کردن L2 Cache پردازدهتان بصورت دستی برای ویندوز XP، باید ابتدا از مقدار اصلی و حقیقی L2 Cache به علاوه مقداری که در حال حاضر ویندوز تعریف کرده مطلع شوید.
اولین مرحله یافتن مقدار L2 Cache حقیقی CPU شماست.
بدین منظور ساده ترین راه استفاده از نرم افزار کم حجم و رایگان CPU-Z است.
CPU-Z را با حجمی کمتر از 600 کیلوبایت از سایت سازنده به نشانی
دانلود کنید.
(در حال حاضر آخرین نسخه 1.49 است که مستقیمأ از
قابل دریافت است.)
پس از دانلود، فایل را از حالت فشرده خارج کنید. سپس cpuz.exe را اجرا کنید.
پس از چند لحظه صفحه نمایش اطلاعات نمایان میشود.
در جلوی عبارت Level 2 در زیرمجموعه Cache میتوانید به مقدار حقیقی L2 Cache پردازنده دست یابید.
در مرحله دوم بایستی به میزان L2 Cache که ویندوز تعریف کرده است پی ببریم تا ببینیم تا چه اندازه درست است.
بدین منظور ابتدا نرم افزار Notepad ویندوز را باز کنید.
سپس کدهای زیر را عینأ Copy کرده و داخل آن Paste کنید:
For each Pro in ProSet
WScript.Echo «www.Tarfandestan.com»
WScript.Echo «Level2 Cache:» & » » & Pro.L2CacheSize & » KB»
Next
سپس از منوی File، بر روی Save as کلیک کنید. فایل را با فرمت vbs. ذخیره نمایید (به عنوان مثال نام آن را Tarfandestan.vbs بگذارید).
اکنون به محلی که فایل را ذخیره کرده اید رفته و با دوبار کلیک آن را اجرا نمایید. پنجره اول را OK کرده و در پنجره دوم مقدار L2 Cache پردازنده را بر حسب کیلوبایت مشاهده کنید.
(جهت سهولت کار میتوانید فایل vbs مورد نظر را مستقیمأ از
دریافت کرده و دیگر آن را شخصأ نسازید. پس از دانلود، فایل را از حالت فشرده خارج کرده و L2Cache_Detector.vbs را اجرا کنید).
این مقدار، مقداری است که در حال حاضر ویندوز برای شما تعریف کرده است. اگر مقدار دقیقأ برابر مقداری است که توسط CPU-Z به دست آوردید پس همه چیز ایده آل است و دیگر نیازی به استفاده از این ترفند نیست. اما اگر مقداری که به دست آمده کمتر از مقدار نمایش داده شده در CPU-Z است ویندوز چندان خوب عمل نکرده و بایستی ادامه ترفند را پی بگیرید.
اگر در حال خواندن ادامه ترفند هستید پس اکنون وقت آن رسیده که مقدار حقیقی L2 Cache را برای ویندوز خود تعریف کنید.
از منوی Start به Run رفته و با عبارت regedit را تایپ کرده و Enter بزنید تا وارد محیط رجیستری ویندوز شوید.
به مسیر زیر بروید:
در سمت راست پنجره گزینه ای با نام SecondLevelDataCache به چشم میخورد.
بر روی آن دوبار کلیک کرده و مقادیر مورد نظر زیر را در قسمت Value وارد کنید.
شما بایستی اندازه دقیق (یا کمتر) L2 Cache پردازنده که به وسیله CPU-Z به دست آمد را توسط روش زیر مورد استفاده قرار دهید.
اگر Level 2 نمایش داده شده در CPU-Z (یا همان L2 Cache حقیقی) 256 یا کمتر باشد، عدد 0 را در این کلید رجیستری وارد کنید.
اگر 512 باشد، عدد 200.
اگر 1024 باشد، عدد 400.
اگر 2048 باشد، عدد 800.
اگر 4096 باشد، عدد 1600.
اگر 8192 باشد، 3200.
و به همین ترتیب برای مقادیر بالاتر.
پس از وارد کردن مقدار OK کرده و از رجیستری خارج شوید.
حال یکبار سیستم را رستارت کنید تا تنظیمات اعمال گردد.
اکنون اگر فایلی که خودتان به شکل دستی با فرمت vbs را ساخته اید اجرا کنید مقدار حقیقی L2 Cache را مشاهده خواهید کرد.
ترفندستان
بالا بردن سرعت اینترنت با یک دستور کاملا ساده
برای اینكه بتوانید از 100 درصد پهنای باندتان استفاده كنید و سرعت بالاتری را در اتصال به اینترنت تجربه نمایید، مراحل زیر را انجام دهید :
1.Run را از منوی Start اجرا كنید.
2. در Run عبارت gpedit.msc را تایپ كرده و OK را كلیك كنید.
3. منتظر بمانید تا Group Policy اجرا شود.
4. در بخش Local Computer Policy و زیر Computer Configuration گزینه Administrative Templates را گسترش دهید. ( با كلیك بر روی علامت + كار آن انجام دهید )
5. در لیست باز شده گزینه Network را نیز گسترش دهید.
6. حال در این لیست Qos Packet Scheduler را انتخاب كنید.
7. به گزینه هایی كه در سمت راست ظاهر می شوند دقت كنید.
8 .بر روی Limit reservable bandwidth كلیك راست كرده و Properties را كلیك كنید.
9. پس از اینكه پنجره Limit reservable bandwidth Properties باز شد در برگه Setting و در زیر Limit reservable bandwidth گزینه Enabled را انتخاب كنید.
10. مشاهده می كنید كه با انتخاب آن در روبروی Bandwidth Limit مقدار پیش فرض آن یعنی 20 درصد به نمایش در می آید.
11.به جای عدد 20 مقدار 0 را تایپ كرده و OK را كلیك كنید.
12.حال به Connection كه به وسیله آن به اینترنت وصل می شوید رفته و بر روی دكمه Properties كلیك كنید.
13.به برگه Networking بروید و دقت كنید كه Packet Scheduler فعال باشد (تیك كنار آن مشاهده شود).
14. این پنجره را OK كنید.
15.كامپیوتر خود را Restart كنید.
این کار را می توانید با نرم افزارهای قدرتمند بهینه سازی ویندوز مثلTuneUp Utilities خیلی سریعتر و راحتر انجام دهید.v
برای بازگشت به حالت پیش فرض هم می توانید مسیر فوق را دنبال کرده و بجای 0 عدد 20 را قرار دهید.
تبدیل متن به تصویر به وسیله سایت یاهو
شاید زمانی پیش آمده باشد که قصد داشته باشید متن خود را سریعأ تبدیل به یک تصویر کنید. برای اینکار معمول ترین کار استفاده از نرم افزارهای گرافیکی نظیر Paint یا Photoshop است تا با وارد کردن متن ، آن را با فرمت تصویری ذخیره کرد. اما شما میتوانید خیلی ساده و از طریق یک روش مخفی در سایت یاهو ، متن خود به تصویر تبدیل نمایید!
برای اینکار:
مرورگر اینترنتی خود را اجرا کنید:
سپس آدرس زیر را در نوار آدرس وارد کنید:
http://l.yimg.com/img.sports.yahoo.com/static/bir/headline?txt=byesale
در آدرس بالا ، در انتهای آن به جای عبارت byesale در جلوی علامت مساوی ، بایستی عبارتی که دوست دارید به تصویر تبدیل شود را وارد کنید.
سپس Enter بزنید تا متن خود را به شکل تصویری مشاهده کنید.
تغییر نام درایو حافظه فلش به هر نامی که دوست دارید
این روزها حافظه های فلش تقریبأ در دست تمامی افرادی که به نوعی با IT سر و کار دارند یافت میشود. حافظه های USB در حجم ها و اندازه های مختلف زیبا هر فردی را وسوسه میکند. به علت همین گسترش ، گاهی مشکلاتی برای کاربران پیش میاید. فرض کنید مجبورید همزمان چندین فلش دیسک را به سیستم خود وصل کنید ، طبعأ چندین درایو اضافه خواهید داشت و تشخیص هر درایو مشکل خواهد بود. یا حتی فلش شما با فلش دوستتان به علت شباهت ظاهری اشتباه شود! در این زمان بهترین راه حل قرار دادن یک نام اختصاصی برای فلش دیسک شماست. به این ترتیب که با هر بار وصل کردن دستگاه به سیستم ، نام درایو به نامی که شما تعیین کرده اید تغییر میابد. در این ترفند به معرفی روش اینکار میپردازیم.
بدین منظور:
ابتدا فلش دیسک خود را به پورت USB وصل کنید.
پس از ظاهر شدن آن در My Computer وارد Driver مربوط به آن شوید.
در فضای خالی از صفحه راست کلیک کرده و از New ، گزینه Text Document را انتخاب کنید.
حال فایل را با Notepad باز نمایید.
سپس در خط اول عبارت زیر:
[autorun]
و در خط دوم:
label=byesale
را وارد کنید.
دقت کنید به جای byesale نامی که دوست دارید به عنوان درایو شما تعلق گیرد را انتخاب کنید.
حالا فایل را با نام autorun.inf ذخیره کنید.
کار تمام است ، اکنون کافی است یکبار فلش را از USB جدا کرده و مجدد به آن وصل کنید.
از این پس فلش دیسک شما یک نام اختصاصی دارد.
دانلود آهنگ با فرمتهاي مختلف بصورت رايگان در گوگل
MP3 ها را به سادگی و دقت در گوگل بیابید.
مردم معمولا فایلهای موزیک خود را در دایرکتوریهای نا مشخص و نامربوط آپلود میکنند. در اینجا راهی برای دسترسی به آنها را معرفی میکنیم:
اگر شما در گوگل به درستی و با روش صحیح جستوجو کنید به راحتی میتوانید فهرستهایی باز از موزیکها و فایلهای MP3 مورد علاقهیتان را بیابید. در این جا روش درست وکارآمد این جستجو را میآموزیم:
Google: -inurl:htm -inurl:html intitle:»index of» «Last modified» mp3
در استفاده از رشتهی فوق ما از دستورات «index of» و «in url» جهت جدا کردن فقط فهرستهایی از موزیکها استفاده بردیم. همچنین در پایان از تگ MP3 استفاده کردیم که به گوگل میگوید در این دایرکتورییهای باز به دنبال فایلهای MP3 بگردد. شما میتوانید به میل خود و به فراخور نیازتان جای MP3 را با WMA یا دیگر فرمتها عوض کنید.
همچنین شما میتوانید جستجویتان را متمرکزتر نمایید:
GOOGLE: -inurl:htm -inurl:html intitle:»index of» mp3 «pearl jam»
این دستور فایلهای MP3 را در دارکتوریهای باز که از گروه pearl jam باشند پیدا میکند. شما میتوانید به جای pearl jam گروه یا خواننده یا حتی نام آهنگ مورد نظر خود را جایگزین کنید.
میزان استفاده از RAM را در فايرفاكس كاهش دهيد
اگر فایرفاکس قسمت زیادی از حافظه کامپیوتر را اشغال میکند، میتوان آن را محدود کرد. به about:config بروید. ” browser.cache ” را در قسمت Filter تایپ و ” browser.cache.disk.capacity “را انتخاب کنید. به طور پیشفرض بر روی 50000 تنظیم شده است. اما شما میتوانید آنرا متناسب با مقدار حافظهی کامپیوتر خود، کاهش دهید. اگر حافظهی رم شما بین 512MB تا 1GB است، 15000 را امتحان کنید.


")


")